Friday 22 November 2013

Crafty Creatives Box 17!!!!

Oh I do love this time of the month! This months Crafty Creatives box theme is.... If you don't want to know look away now.... 

MEDIEVAL!!! 
"Take a step back in time and immerse yourself in beautiful and lavish decoration and pattern!" 


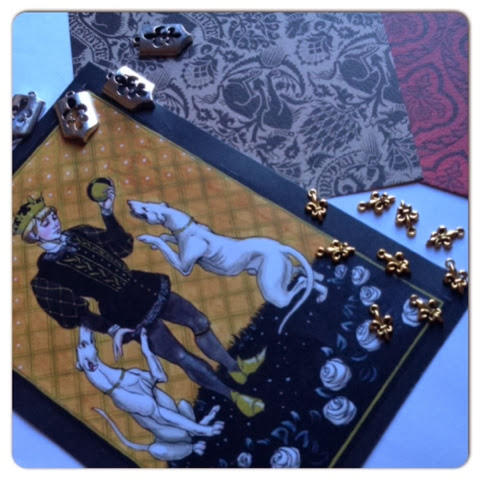
The Art Card this month is brought to you by German artist Luisa Kelle. www.cidaq.deviantart.com 

Fleur-de-lis charms - So many uses for these! So it's a good job the Crafty Creatives have given us so many! Jewellery, gift wrap, card making, bag charms the list is endless! 

Shield pendants - I'm unsure what to do with these?!? Any suggestions? 


The CCKit - This months kit is to make your own bracelet using a bead weaving technique! Looks like fun! 


Silver Metamica paint - I am really looking forward to trying this! I've never used it before and it looks like a whole lot of messy fun! 

Metallic fibres - I have used these before and they are amazing! Easy to use and look great on a card! 


Fabric - I know lots of you will be happy to see the return of the FQ! The colours are perfect for this time of year too!

Craft papers - We all know how I adore craft papers for my cards and the patterns on this months papers are divine! 


Red glass beads - I have a feeling these will end up on something Christmassy!

Washi tape - I have sooo much washi tape and this is a great addition to my collection! @emmapbeautiful on Instagram has made a lovely card using this! 

Two crown charms - these would look cute as zip pulls! Simple to do and would make a great finishing touch. 

Two metal filigrees - One of my favourite items in this months box, maybe a couple of brooches or hair slides??? 


Another huge mix of products from the Crafty Creatives team! Stay tuned for more tutorials from your CC Calaborator! 

Tuesday 29 October 2013

***NEW*** Top 5 Tuesdays!!!

 
Top 5 Instagramers
 
New to the blog this week I am introducing top five Tuesdays! Each Tuesday I will bring you my top five of something. This week is my top five Instagramers! Below are my favourite people to follow and a little bit about what they have to offer!
 
No. 5

 
At Number five is an childhood friend of mine Samantha Challenger. (aka Sammy) Sammy's Instagram is full of fashion and beauty. Perfect for a busy mum like myself! She is also an amazing blogger and blogs a huge variety of fashion and beauty, Testing lots of product and sharing her view on them.  http://instagram.com/sammycx http://www.myladyboudoir.blogspot.com/
 
No.4

 
At number four is Mummybird. Claire Mumford is a mum of three who makes beautiful jewellery. Claire's instagram is always full of pretty things! You can find her on Instagram here http://instagram.com/mummybird and she also has an Etzy page http://www.mummybirdpretties.etsy.com/ where you can purchase lots of her jewellery.
 
No.3

 
At number three is Gaze of Dolls. Take a look into Louise Williams whimsical world of wonderful whales! I have purchased postcards and stickers from Louise's amazing collection on Etzy. Not only did they arrive super fast but they are fantastic quality and the designs are all original and a little different! You can find her here  http://instagram.com/gazeofdolls on Instagram and take a look at her etzy page here http://www.etsy.com/uk/shop/gazeofdolls.
 
No.2


At number two is Polkadots and Petticoats. I love love love Jackies Instagram and I have purchaced a few things from her online store. Recently I brought a super cute bunny night light for my little girls Christmas stocking! She sells the most beautiful items from dresses to scarves to home items. All at a great price and beautiful packaging! http://instagram.com/polkadotsandpetticoats buy at http://www.polkadotsandpetticoats.co.uk/
 
No.1

  
 As a massive card maker and paper crafter my number one has to be Graphic45! I have so many graphic 45 products! But the papers are my favourite. The graphic45 Instagram page is always full of tons of inspiration for me. Check out their instagram here http://instagram.com/graphic45.

 
Hope you enjoyed the first Top 5 Tuesday! More next week!


Monday 28 October 2013

CCBox16 - Paper Bead Necklace Tutorial...


Inside this months CCBox we received two colours of admission tickets. Straight away I knew these would be perfect for paper beads! The Crafty Creatives team sent me blue and orange, I also got blue and pink in my box, what colours did you get???
 
Once you have learnt this easy technique you will be making beads out of any paper you can find!


What You Will Need

Your Crafty Creative admission tickets.

Clear nail polish or PVA glue.

Leather cord or ribbon (I used leather cord which you can find here http://www.beadsdirect.co.uk/)
 
Cocktail sticks.


Strong double sided tape (I have used affixit super sticky tape which you can find here http://www.affixitcraft.co.uk/)
     
    Step One


    First of all take a cocktail stick and start to wrap one of the admission tickets around it.
     
    Step Two


    Once you get about half way down the ticket put some double sided tape on it (or PVA) and continue to roll it up to the end. Hold for about thirty seconds to a minute depending on what adhesive you have chosen.
     
    Step Three


    Next coat your bead in clear nail polish to seal it. You could also use PVA for this bit too. The stix2 we got in this months box would be perfect.
     
    Step Four


    Now to thread your beads onto your necklace. First thread a bead onto your chosen cord/ribbon.
     
    Step Five
     
     
    To thread your second bead push one end of the cord from left to right through your second bead, and the other end of the cord from right to left through your second bead. Pull the cord tight so they sit snug on top of each other. Repeat this with as many beads as you wish. You have now formed a pendant!
     
    Finish
     
     
    That's it your done! The rest of your cord becomes the necklace. You can either tie the ends or add a clasp or sliding knot to finish it. You could also make matching earrings or a bracelet! Check out my Instagram over the next few days for more paper bead ideas!


Saturday 26 October 2013

CCBox16 - Circus Cake Topper Tutorial...

Circus Cake Topper Tutorial

Octobers CCbox brings us a fantastic circus stamp set! There are two fabulous sets... which one did you get?


The great thing about this tutorial is that once you have grasped the basics you can get as creative as you like!


To start this is what you will need...


Your Crafty Creatives Circus stamp set (set 1 or set 2)
 
Black stamping ink. I have used Dovecraft premium pigment ink in jet black.
 
Cocktail sticks
 
Double sided tape
 
White and red card (colours are your choice, white is always easy to stamp on and red reminds me of the circus!)
 
Craft knife, pencil and ruler to measure and cut out your circles. (I cheated and used my cutting machine to do this. You could also use a punch.) Pre cut all your circles before you start. I made mine 2" for the white and 2 1/2" for the red but you could make any size you liked. You will need twice as many white as you will red.
Step one


First of all take one of the smaller circles and using double sided tape adhere it to one of your larger circles. Repeat this with all of your circles.

Step Two


Take your choice of stamps and using the ink stamp them onto the circles. I have used circus set 1. I stamped this frame...


...and then i stamped a super cute animal in the centre. I used a different stamp for the centre for each topper so that they were all slightly different.


Step Three


Next you need to attatch the sticks. Take some double sided tape and stick one coctail stick to each of your backing circles.


Finally press onto the back of your circles that have the stamped images on.

Your Finished


Your finished! These are so simple to make and great for kids parties! Below you can see other items i have made using the stamps and even matching party ideas!


CCBox16... The Circus Box!


This months box is the Circus Box! The art card by Luke Spooner (who also created last years Gothic art card) has to be one of my favorites! You can check out more of his work at www.carrionhouse.com 


The box has come when the Circus is actually in my town! My Son is going on Sunday so he was also excited to see what was inside this months CCBox too! 

So what's in this months box...

•CCKit - This months kit is to make a animal pendant necklace! 


My kit came with a gorilla... What did you get? 


•Stripped buttons - I am a button hoarder and I love the buttons we received this month and they will be featuring on a card soon!

•Circus stamp box - I am a papercrafter so this was perfect for me and my favorite item I have received of all 16 boxes so far! 


•String of purple glass beads - these are beautiful! Purple is my favorite colour and I think these will probably end up as a bracelet!

•Masquerade pendants - my sister is an amazing singer and she loves the theatre so these are going onto a makeup bag I am making her for Christmas!

•Set of admission tickets - I have lots if ideas for these! 

•Craft papers - The craft papers we receive from Crafty Creatives are always such great quality. Perfect for cardmaking! 

•Suggested extra kit - This month we also received an extra kit to make your own vintage circus coasters! 


Image transfer is great fun and can be used in so many ways! Check out the CCBlog for a guide on how to image transfer. 


This months box was extra exciting for me as last month I was chosen by the Crafty Creatives team to join them in their creativeness and become a Crafty Creatives Callaborator! 

Crafty Creatives sent me a few of the items from CCBox16 early so that I could create tutorials for you all! (How exciting is that!) The first one will be featured on my blog today and then I shall post more tutorials through the week too! Please feel free to ask question if you get stuck on anything or need any advice. I hope you all enjoy the tutorials I had lots of fun creating them for you all! 

I'd also like to thank the Crafty Creatives team for choosing me to be part of such a creative and friendly team! 

Enjoy! You can also follow me on Instagram. I post lots of my CCmakes on here. Also #ccbox16 #craftycreatives on Instagram to see some extremely talented subscribers! 

Friday 20 September 2013

Crafty Creatives CCBox15....

*****SPOILER ALERT!!! IF YOU HAVEN'T RECEIVED YOUR BOX AND DON'T WANT TO RUIN THE SURPRISE LOOK AWAY NOW!!!!***** 

This months box was a little different... The theme is MONOCHROME! So no colour at all!!! Very on trend if you follow fashion and also very suited to the grey skies we now have! 


First thing that hopped out of the box, as usual, is the art card. This months art card is by New Zealand artist Jo Newham. I really love the art card this month and its has also made me determined to do something with the huge pile of art cards I now have! 


 The kit this month is to make your own needle felted sheep! Ccbox7 bought us the needle felt leaf kit which I absolutely adored so I am really looking forward to this kit! 


The Domino beads in the box also caught my eye. Although I'm not sure what these will turn into yet! 


Also included in the box are;

•A graphite pencil - not used one of these since college!
•A Stabilo Sensor Pen - I have several of these and they are excellent for using in my cardmaking!
•A Crafty Creatives doodle book - this is so cute can't wait to have a scribble!


•Single polymer clay rose - I love this! Again not sure what to do with it, at the moment I actually just want to stare at it! 
• Mini blackboard peg - I really want to use this on a card but it might be too big! 
•Some black and white headed pins - I do lots of sewing so these will be used again and again!


•Tea bag folding squares - I have never done tea bag folding before so I'm looking forward to learning yet another craft! Thanks CC!
•Aubrey Beardsley prints - I LOVE these! I did a huge project on this illustrator at school (many years ago!) I recognise many of these! 


The final item is a fat quarter of this amazing monochrome fabric! I have so many ideas for this I don't know what to pick!!!! 

This month I aim to do lots of posts with all the things I've made! I have been so busy the last month! And poorly! I realised that I have made lots of things that I haven't shared so watch this space! 

Remember I am on Instagram @mrsgcrafts and twitter (link on blog) and I share a lot of my makes here. Check them out this month with #ccbox15 #craftycreatives 

Wednesday 21 August 2013

Crafty Creatives Box 14!!!!!

*****SPOILER ALERT!!! IF YOU HAVEN'T RECEIVED YOUR BOX AND DON'T WANT TO RUIN THE SURPRISE LOOK AWAY NOW!!!!***** 

Normally I either miss my box and have to go and collect it OR I spend most of the day pacing the house waiting for it to arrive! Today my postman MUST of had his weetabix! Because this morning he knocked on my door at 8am and woke me and the children up! I have to say as I woke up and heard the knocking, my feet barely touched the stairs as I ran down them! I knew it could be my box and he even said to me "sorry for waking you, although you look rather pleased to have your craft box!" After over a year of receiving them I'm not surprised even they recognise the pink packaging! 

Anyway! This months theme is WESTERN!
Howdy partners and here is a first look at what came in this months Crafty Creatives Box 14! Unfortunately I was not the golden ticket winner :( but the box is however packed full with lots of crafty goodies all themed around cowboys and Indians! 


I LOVE the art card by Anastasia Alexandrin, an artist from Philadelphia, take a look at more of her work at www.aalexanderin.com. 

 
 When I first opened my box I scrambled through it so fast I thought I had an item missing! But the tiny little bear fetish pendant was hiding in the CCkit! It's so cute and I think it will become a bracelet! 


The papers we get in the boxes are always one of my favourite items and this months are so cute! I love the patterns! Especially the cowboy print! I feel a card making session coming on!


This months box has two kits! The first (which I am quite excited about!) is a dream catcher kit! These always remind me of my mum as she loves all western style decoration and myths.


Kit number two is to make your own mini rope basket. Looks simple and I'm thinking I could buy more rope and make huge ones! 


Back of the art card is always as lovely as the front! 


Here is a quick rundown of this months box;
• Art card by Anastasia Alexandrin 
• CCkit - dream catcher kit
• CCkit - mini rope basket
• String of turquoise beads 
• Bronze star studs
• Feather charms with turquoise stones
• 1 metre of suedette floral cut trim
• Piece of printed fleece 
• Single bear fetish pendant 
• Two pieces of American recycled denim
• Two sheets of printed craft paper.  

Right, I'm wasting no more time... Off to make use of all this beautiful stuff! I may need some research and inspiration and if I find anything amazing I shall blog that too! Ideas welcome please!